Monday 27 June 2016

2016 Touring the ALPS in the TRACER 900


This year in July 2016, me and my wife we are going to Tour the Alps in a yamaha Tracer 900 for a week.

The objective of this tour is for us to spends some quality time together (that's important!) discover the great Alpine roads and views (also extremely important) ,to experience the cuisine, meet the people, see the folks daily routines and most important of all enjoy some vacations together doing something we love, riding a motorcycle.

Let's start from the beginning, I have been riding motorcycles for a greater part of my life and it is just something that feels my soul with passion, it's so effective I now ride a motorcycle everyday to work. Every time I get myself in top of the saddle, the stress stops, no concerns, no problems (just the usual retarded drivers, but that I got used too now) no telephones, no responsibilities, massive freedom. In conclusion a great get a way from your daily stress.

If its good weather on a weekend, I am certainly out riding. Doing what you ask ? well riding a motorcycle will give you all kinds of pleasures, you are free to watch 360 degrees around, you are exposed and more connected to all the elements, therefore wind in your chest and the smell directly in your nose, like ridding a horse but better in a lot of ways. All these sensations also come from the root fear of having no protection around you and knowing that you can easily die or get injured in certain situations, does it scare me ? yes, do I stop it , no ! why? because it makes me feel free and alive! Its something I Intrinsically love and believe will never get tired of.

Now back to the trip, After 2 years of deciding that I was going to ride a bike everyday, the curiosity and the excitment of trying different motorcycles started (not difficult for me as I will get excited over anything I can drive :), ask anyone who knows me well). After getting this excited I started to check for Other roads, more twisties (turns) and more people, going for Meetings, Ride outs, Motorclubs, Small Tours, the Comradry etc.. It all took me to the place where it felt like, I needed to get out of here and just have road in front of me, and go for an adventure with small to no planing. Excitment again! Plus I will take my wife with me. Double pleasure, It wasn't very hard to convince her, this means we can also have quality time together.

Now its time for preparations..


Our Preparations/planning:

Trip 


where to go ?

- Departure -
Zaandam (NL)
1st day  - Michelstadt (GER)
2nd day - Lichtenstein (GER)
3rd day - Bormio - Stelvio's Pass (ITA)
4th day - Alpbach (AUS)
5th day - Incognito (somewhere in GER)
6th day - Incognito (somewhere in GER)

why? - because every real motard, biker. squid, rider should tour the alps and check those amazing roads with breathtaking views. if you own a motorcycle in Europe, go there!

- where to stay & why? - we booked hotels for the first 4 days because camping is not an option for me, I will be taking my wife on pillion so I definitely need to have a rest and a shower, not willing to suffer on my vacations.

-Freely travel and look for something every night ? we will do this on our way back (eventually the next time from beginning if it somehow proves to be less stressful or more exciting. )
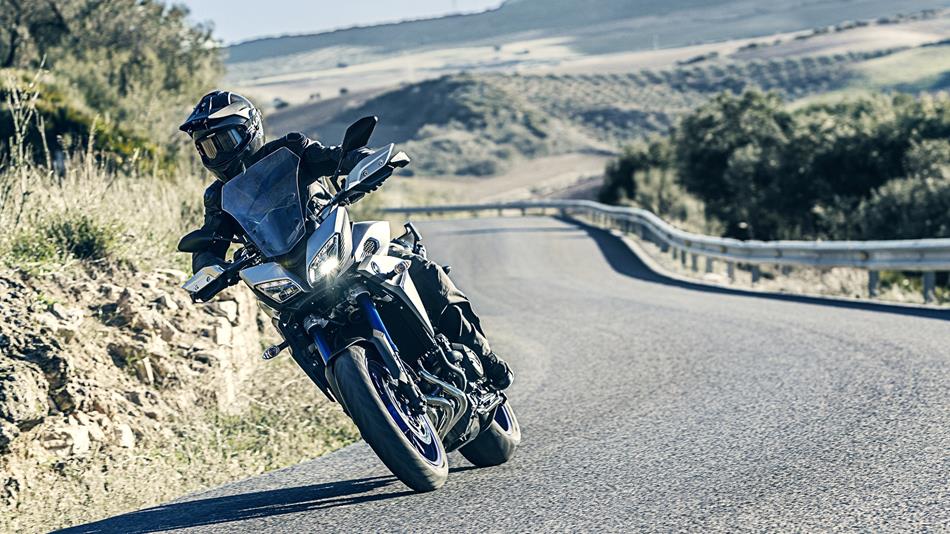
Motorcycle 
Yamaha MT-09 Tracer


Accessories
- GPS - under investigation, most likely a TOMTOM 400 Rider.
- Top/Side Cases - Top - Hepco and Becker Gobi Top case 42liters / Sidecases OEM SW MOTECH Soft side cases
- Taller Windscreen - Fabri - Gen X!
- Seat - will remain the OEM.


Rider and Passenger Gear
- Protection
      - rain gear - n.t.b.
      - riding gear - Done!
      - helmets - Done!
- Communication -  Cardo Scala Q1 Duo
- Hydration - under investigation - most likely Camel Bags
- First Aid Kit - n.t.b
- Flat Tire Kit - n.t.b
- Set of Tools - Comes with the bike, added a hexa set of keys.
- Fuel plan b - n.t.b
- Recording - n.t.b
- Documentation - DoHotels booked for the first 4 days going down and around, and returning to Holland will be random.
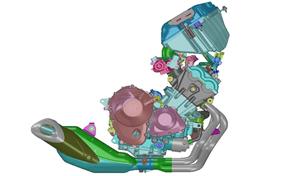

Thursday 23 June 2016

DYI CHAIN AND SPROCKETS


HOW TO REPLACE YOUR CHAIN AND
SPROCKETS | HANDS ON by Sportrider.com


The connection between the engine and rear tire doesn't last forever; here's how to replace your bike's final-drive setup.
By Kent Kunitsugu Photography by Andrea Wilson Posted June 14, 2016 on Sportrider website

The drive chain and sprockets of a motorcycle are considered by the manufacturer to be consumables, meaning those parts are expected to wear out and be replaced at least once or twice during the expected usable life of the machine. Add to that one or any combination of neglect, hard usage, mis-adjustment, and/or harsh conditions, and you’ll discover that a chain and sprockets replacement is in order for your bike. Note that we said both chain and sprockets; like many moving parts that wear in with each other during their lifetimes, you must replace both at the same time in order to avoid causing an even shorter life for your new parts.

Replacing the chain and sprockets is a fairly easy task, but there are some pitfalls to watch out for along the way. Here’s a quick photo tutorial on the job that will help you avoid those problems and get you back on the tarmac quickly.


Here are the basic tools you’ll need to replace your chain and sprockets. The important ones are a full-size breaker bar (third from right), an extension pipe for the breaker bar (far right), a block of wood to stop the rear wheel, a chisel to bend out the countershaft sprocket lockwasher (just left of the mallet), and a chain breaker and rivet link tool (blue box). Just as important: the proper factory torque specs for all nuts and bolts (paper, top).

1 of 9


1. After removing the countershaft cover, take the chisel and hammer/mallet and bend the lockwasher tabs holding the countershaft nut in place. Some lockwashers have two tabs, so make sure that you bend all the tabs back. And make sure they’re bent back flat; if not, they’ll keep the socket from fully seating on the countershaft nut, which could result in a lot of cursing and thrown tools in the shop.

2 of 9


2. Place the block of wood into the wheel so that the wood butts up against the swingarm and prevents the wheel from turning. Make sure the transmission is in neutral and that nothing is pinched between the wood and swingarm. Carefully hold the socket/breaker bar on the countershaft nut, and use the extension pipe to gain leverage to break the nut loose. Don’t remove the nut yet.

3 of 9


2a. A very good tool to have that will break loose the most stubborn countershaft nut is an electric impact wrench. There are many cordless electric impact wrenches on the market ranging from $125 to $300 that will get the job done. These are better than the pneumatic impact wrenches because they don’t depend on air pressure for their torque, and there are no hoses to deal with.


4 of 9


3. To remove the old chain, use a chain-breaker tool to push out one of the link pins (you can use a die grinder or other method as well), keeping in mind that if your chain isn't stock and has a clip master link, you'll need to remove the circlip and master link. It’s best to do this on the rear sprocket so that it’s stabilized while you work on removing the link pin. Remove the old chain, the rear wheel, and both front and rear sprockets.

5 of 9


4. Place the rear wheel sprocket side up, making sure the brake disc doesn’t contact the ground; if it does, place wood blocks or a tire underneath to keep the rear disc from getting damaged. Install the new sprocket, and lightly hand-tighten the sprocket mounting nuts. Then use a torque wrench to tighten the nuts to factory spec in a crisscross pattern. Don’t make the mistake of just tightening them “any ol’ way.” Replace the countershaft sprocket with the new one, install the lockwasher, and lightly tighten the countershaft nut.

6 of 9


5. Reinstall the rear wheel on the bike, and (unless you’re a racer with specific needs) make sure the axle adjusters are set closer to the front; this will give you the most room for slack adjustment as the chain wears. Run the new chain over the sprockets, pulling the chain tight to run up the backside of the rear sprocket. Don’t try to measure it any other way. Where the chain meets on the sprocket is where you’ll push out the link pin.

7 of 9


6. Once you have the new chain cut to length (remember to measure twice and cut once), install the rivet master link, making sure that the O-rings are in the proper position (just inside of the outer plates). We prefer rivet master links to the old circlip master links because high speeds can potentially cause the circlip to come off (and, yes, this is despite glue, safety wire, silicone, etc.).

8 of 9


Photography by Andrea Wilso

7. A rivet master link installation tool will have a block that allows you to properly press on the link plate and then a tool head that is used to peen over the end of each master link pin (note that the ends of rivet master link pins are hollow). Carefully tighten the tool to peen over the master link pin ends. Too much torque and you will end up cracking the master link pin end, rendering it useless.

9 of 9


8. Temporarily tighten the rear axle nut and use the wood block or other method to prevent the rear wheel from turning. Use a large torque wrench and extension pipe (or a pneumatic torque wrench gun if you have one) to properly torque the countershaft nut to factory spec. Slightly loosen the rear axle nut, adjust the chain-tension adjusters to get the proper chain slack, and torque the axle nut to factory spec.


THIS ARTICLE IS BEING RE-SHARED FROM: http://www.sportrider.com/ IT IS A WAY FOR PEOPLE TO LEARN I DON'T INTEND TO BRAKE ANY COPYRIGHT LAWS.

Thursday 9 June 2016

YAMAHA MT09 Tracer (Tracer900) - Fun Factor vs Rider Customization


Picture: Emanuele Burato 

I have recently bought a Yamaha Tracer 900 and I love her to bits, If I could describe this motorcycle in one word: FUN! ..however there are some issues I need to address. None the less this motorcycle is a great bike for the Specs/Price tag with its downsides. 


At first I got extremely angry with Yamaha how could they pass this in QA, why wasn't this done, why did they changed that, why this why that, First of all, one should realise that this is Yamaha's "other" answer to sports touring, not everyone wants to ride a boring and comfy FJR so people should keep this in mind, before they start cataloging this bike as a Sports Tourer (like the FJR). 


In my humble opinion Yamaha has made a big, big mistake when they labeled this bike as another Sports Tourer... (I would have called this segment Road Adventurer or something of those sorts) I believe this would have made it more appealing to the correct end user, but hey The MT09 Tracer is A M A Z I N G L Y FUN! I'm no genius in Marketing so who cares...

My small first conclusion the bike costs less than any other competitor (within the same category, best example the Triumph XC, or one of those NC Xover models from Honda ).


This Decepticon type of design has launched the Tracer to the Stratosphere of sales plus it comes with a CP3 Engine which is AMAZINGLY FUN and RELIABLE!!! therefore budget wise, Yamaha had to leave some things "a side" for the user to dial in or improve/remove. Yamaha for my taste has left things open, such as:

Windshield - the format of this windshield is beautiful but not efficient, because it causes Turbulence in riders helmet.. you can literally start to go deaf. 


The Seat - Could be dis-comfortable for some people. I find it harsh and that I have to stand up sometimes, so that my bum doesn't become a plank of wood. Now I got used to it, with time it improves a bit. There is a Comfort Seat from Yamaha, a lot of folks say the difference it makes is not worth the money and that the best option would be to have a custom made seat. If I think about touring I guess it makes sense.. however I am willing to try with the OEM as I heard you can get used to


Suspensions - they are very soft and tend to bounce on irregular roads and I believe that they could actually be one of the main contributors for the "famous Tracer900 speed wobble) users report the bike wobble others dont, so it can all be related with weight and shocks settings.


Rust in Rear Shock - (FIXED)This has been fixed by the dealer Arie Molenaar where I bought the bike because this falls under warranty, other users got a new shock installed, I might as well do it if I see rust again.


Speed Wobble - I am convinced the origin is a conjunction of elements, suspension not set up correctly /screen/handguards)


OEM Tire Selection - Yamaha has decided to equip the Tracer with Dunlop's 222, these tires are ok, but the grip provided . let's say it's not the most efficient and the front can give you a false feel. Yamaha's are notorious for their light front end (wich ultimately provides amazing feedback to the rider), with such a light front end you should be able to trust your front tire like you trust your parents, so I cannot understand why these tires were selected at all, I believe again it all falls to budgetting.


TESTING TO SOLVE ISSUES


I started to realize that I needed to test all the different bits, reading the internet over was turning everything into one big confusion, so to see if I could determine the main reasons for my issues, I am doing these little tests in steps and taking my conclusions. (For your info: I am 1,74m and 69kg, ride solo most of the times)


- Windshield -


1. Different positions - All three different positions tested.

RESULT: I could only get rid of turbulence if I really got low on the bike like if I were riding a supersport Motorcycle.

2. Removed the windshield - I am still driving like this, I love how it looks as well (the OEM windshield is IMHO the (main) cause of the turbulence in the helmet but also in the steering I say this because the way the air was being routed through underneath the hand guards covers and in between mirrors and sides of windshield,
RESULT: The front end is much more reliable, feels more connected to the ground

3.Taller Windshield - For Touring comfortability , I need to have wind protection without turbulence, as a result I looked over fora lot of different options and I believe the shape of the windscreen I Ordered, a FABBRI Touring X Windshield will give me peace of mind and allow me to listen to songs and not get tired so easily.
RESULT: I have literally been able to remove at least 85% of the direct wind turbulence from my body to the top of my helmet with this screen. I defenitely advise you to test different screen shapes and sizes, they all have their good and bad points.


- Handguards -

1.Top covers removed- This test for the Hand guards covers was with OEM windshield on, before going to work, I removed only the extra covers on top of hand guards because they cause movement in the steering, they act like little spoilers which I believe were affecting the stability of the MT09 Tracer (Tracer900) Steering.
RESULT: the flighty feeling of the steering is for me literally gone even with crosswinds and turbulence winds from cars trucks next to me and in front of me etc..,

2. Removing covers completely- I want to see if the handguards are directly connected with the wobbly steering, before I start messing around with Suspension.
RESULT: t.b.a


- Suspension -

1. Dial In the OEM settings- starting from there, so that I don't get confused.


2. Settings for 69kg rider- I will then try to use some settings I found on a internet forum, from a guy that has the same stature I have, eventually tweak them a bit to my own taste :
RESULT: t.b.a

For your info and for my practicality I will leave the settings here:


1st attempt setup:

Setting your SAG:

FJ09 / MT09-Tracer Front Travel Suspenion: 137 * 30% = 41.1mm
FJ09 / MT09-Tracer Rear Travel Suspenion: 130 * 30% = 39mm


weight of rider: 152 lb / 69kg

single/2-up: single
tyre psi: 34 / 36 (factory recommend 36 / 42)

FRONT:
front preload: 6 lines (towards soft)
(standard 16 mm; 4.0 mm ~ 19.0 mm; 4.0mm being hard ~ 19.0mm being soft)

front rebound: 9 clicks (towards soft)

(standard 7 clicks;1 ~ 11 clicks;1 being hard ~ 11 being soft)

REAR:

rear preload: 3 (towards soft)

(standard 4; 1 ~ 7; 1 being soft ~ 7 being hard)

rear rebound: factory stock


Want to adjust your suspension? Check this article from MCN where they teach all the steps to do it the correct way.


- Tires -

This is a question of Taste obviously, Originally the bike comes with Dunlop D222 Tires, the specs are:

120/70/17 Front
180/55/17 Rear

These tires aren't the best, just like Andy Downes mention in his MCN Tracer long term review, they can give some false feelings and aren't very quick to warm up. That being said, if you get this motorcycle you have two options, one go through the set of tires and upgrade later on for something that gives you the confidence (that is if the Dunlops dont fit your taste), or alternatively you can sell them in second hand and invest a couple of quid to get some nicer tires. 


I will continue to update this post as I go along. by the way, I love my Tracer a little but more everyday ;)... not everuyonwe can say: I own a Decepticon! 

Friday 3 June 2016

Electronic Rev Limiter caused the failure of both Valentino and Lorenzo engines.


Yamaha has finally revealed that an electronic issue, related to the behaviour of the rev limiter on MotoGP's new standard ECU, was the cause for its engine failures at Mugello.

Jorge Lorenzo was first to suffer a problem, in the morning warm-up, with factory team-mate Valentino Rossi then forced to retire from his home event in a cloud of smoke while shadowing Lorenzo for the race lead.
Yamaha YZR-M1 Project Leader Kouji Tsuya said:
“After the technical problems in Mugello the two defective engines were returned to YMC for investigation. Following our detailed investigation of the engines, telemetry data and related systems we found the cause of the failures.

“The failures were caused by an electronic issue related to the rev limiter which ultimately resulted in valve and piston damage. The cause for both Jorge's and Valentino's engine failures was the same. To be clear, there was neither an engine component nor a structural failure, it was purely an electronic control issue.

“Valentino's failure was caused by an accidental over rev in acceleration that occurred jumping over a crest with full throttle at the end of the straight. This failure was not in any way related to the mistake made by Valentino at the San Donato corner on the lap before.
Turn 1 of 15 - San Donato - Mugello Circuit Scarperia
“There were no special mapping settings used for Mugello; we used the same precise mapping as always. We have now withdrawn both engines from the allocation for the season.

“We have a strong history of engine reliability and this fact does not change after this incident; the engines had no problems, but we were not aware of the different behaviour of the standard ECU software, that made the rev limiter work in a different way compared to last year. We set the rev limiter using last year's data in exactly the same way as we did last year, but we could not be aware that the software worked in a different way.

“Valentino's engine was the freshest of the three that were sealed so far from his allocated engines, therefore after Jorge's Warm Up engine failure there was no reason to consider replacing it. Furthermore we couldn't find out the electronic issue in Jorge's engine in such a short timeframe.

“Mugello is one of the most critical circuits because of jumping over a crest with full throttle on the straight, and engine RPM becoming higher. We have learnt from this incident and already modified the rev limiter setting, so it will be OK in Catalunya."

Yamaha, Honda and Ducati riders are restricted to seven engines for the season. All seven must also be of identical spec, due to the development freeze. Given Yamaha's Mugello problems, concerns were naturally raised that there may be an inherent design weakness with all of this year's M1 powerplants.

Tsuya underlined that this is not the case and that, now the rev limiter setting has been modified, there are no concerns over the remaining engines. However, in case other engines used during the Mugello weekend were also subject to excessive strain, these will only reappear in practice.

Rossi and Lorenzo had both opened three of their seven engines by Mugello.

"As a precautionary measure, the other engines used by both Valentino and Jorge in Mugello will be used only for practice sessions, until their life cycles are completed," he said.


“We understand an electronic issue caused the failures in Mugello, therefore we do not need to intervene with our remaining engines that are not yet sealed. We still have enough engines for the remainder of the season. We have already devised a countermeasure, so we are confident that the failures in Mugello will not recur."

Wednesday 1 June 2016

Yamaha's CP3 engine

The CP3, this modern and fuel-efficient engine incorporates the latest racing technologies. They combine power and precision with light weight.

Its DOHC engine design features downdraft intakes, forged pistons, plated cylinders and fracture-split connecting rods.

“We were able to make this engine 10 kilo’s lighter than the 4-cylinder FZ-8 engine” states Project Leader Akira Kimori.


Engine CAD


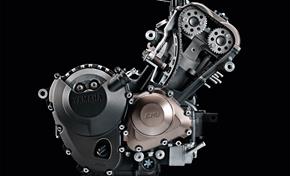
Engine with offset cylinders
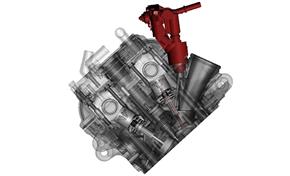

Injection precision


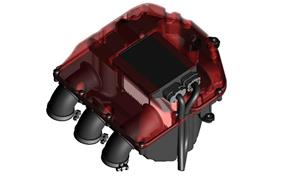
Intake funnels with uneven lengths


Offset cylinders The cylinders are offset by 5mm from the centre of the crankshaft to reduce friction losses: a recent Yamaha technology already applied in the YZ450F motocrosser.

By offsetting the cylinders, the conrod position is more straight under the piston at the moment of greatest combustion force and the piston is not pushed into the cylinder wall so strongly. This also improves fuel efficiency.

Injection precision The fuel injection uses 12-hole injectors that are attached directly to the cylinder head for precise and efficient injection directly at the valve skirt. At the same time, this position enables a shortening of the throttle body, for better performance in the high rpm range.

Yamaha’s fly-by-wire throttle (YCC-T) ensures an exciting and direct throttle response which can be adjusted by the D-mode system in three different settings.

Quicker warm-up Even the water cooling route is kind of unique: our engineers developed a layout with short hoses and a thermostat located before the water pump, resulting in light weight and quicker warm-up (which even helps for fuel efficiency and emissions too).

Sound Also remarkable on this engine are the intake funnels that contribute to the excellent intake sound. They have been designed with uneven lengths. The first cylinder funnel is 102.8 mm, the second 82.8 mm and the third is 122.8 mm so that the power and torque curves produced by each intake, complement one another positively. This results in excellent torque characteristics in the middle rpm range and up. And it also helps to give a pleasing, fine-tuned intake sound.

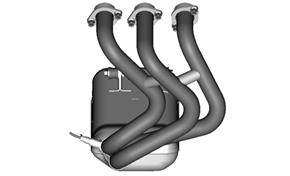
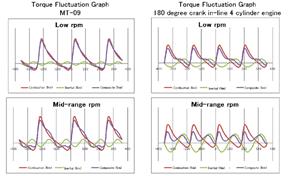
Combustion torque and Inertial torque add up to Composite torque


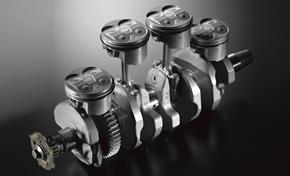
In a normal in-line 4-cylinder, two pistons always rise and fall at the same time


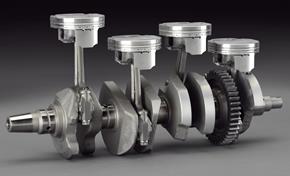
In a crossplane engine, pistons are 90 degrees apart


In a 3-cylinder engine, pistons rise and fall 120 degrees apart

Clean torque Inside an engine there are two main forces creating the final pulling force at the drive axle.

The first one is the combustion torque: created by the explosion in the cylinder.

The second force is the inertial torque: created by the rotating mass of the crank and the mass of the pistons moving up and down.

Especially the inertia created by the pistons that have to stop and reverse their motion at the top dead center and top bottom center of the piston stroke, interfere strongly with the combustion torque (as you can see in the graph).

In a normal in-line 4-cylinder engine, two pistons always rise and fall at the same time, and the four pistons are all at the same time in a dead point (two in top dead center and two in bottom dead center), which creates high forces that work against the combustion torque.

Yamaha already developed the famous 4-cylinder ‘crossplane engine’, in the M1 race bike and the R1 supersports, to harmonize the interference of combustion and inertia torque. We call it “clean torque”.

In the 3-cylinder engine, there is a similar clean torque effect. The pistons rise and fall 120 degrees apart so they are never in a dead point at the same time and the inertial torque is much less and also less interfering than with a normal in-line 4-cylinder. So both the crossplane P4 and the P3 engine have the clean torque delivery which is in line with Yamaha’s philosophy to create a unique interaction between rider and machine.

The result is that the rider can feel a more direct connection to the combustion torque. In short, better control of engine power, resulting directly in more excitement!